6 Create and Edit Parts
Pressbooks
Most books contain three primary components: Front Matter (things like copyright and preface), Back Matter (things like index and appendices) and the Main Body (at least one ‘part‘ with at least one ‘chapter‘). In Pressbooks terminology, a ‘part’ is a container which can contain as many individual chapters as you want. It may be helpful to think of a part as a discrete section or unit in your book.
When a book is first created in Pressbooks it has a single ‘part’ called ‘Main Body’ which contains a default chapter called ‘Chapter 1’. You can add more parts, and rename or delete existing parts, though your book should typically always contain at least one part.
Add a New Part
To add a new part to the main body of your book:
- Click ‘Organize -> Add Part‘ from the your book’s left-hand admin menu (or the ‘Add Part’ button on the Organize page)
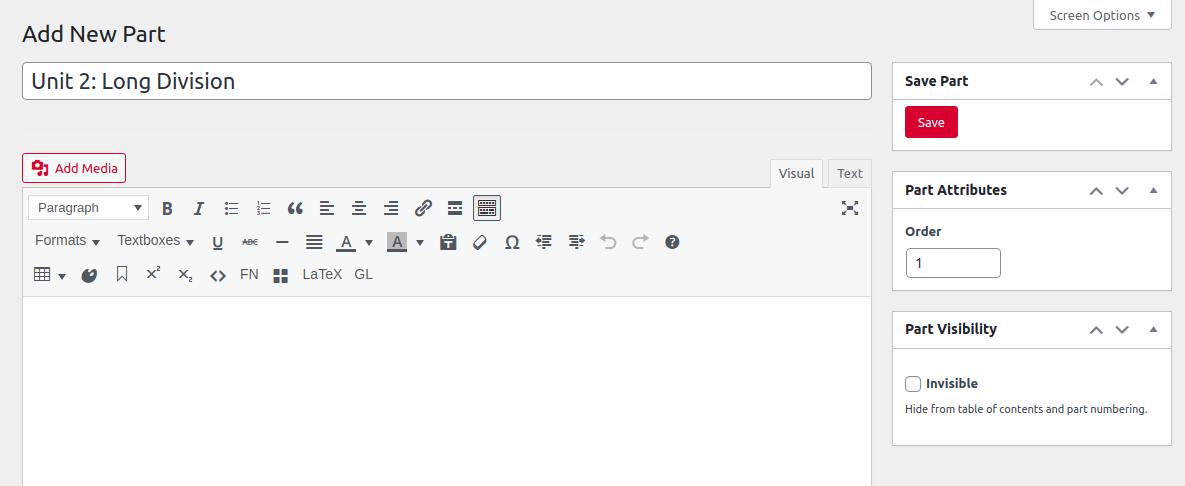
- Enter a title for your part on the Add New Part page.
- Add textual or other content for the part itself, if desired.
- Add a number to the Order input in part attributes to control its placement relative to other parts in your book (parts are displayed in numeric order, with 0 appearing first, 1 next, 2 after that, and so on)
- Click the ‘Invisible’ option in Part Visibility if you’d like to hide the part itself from your table of content and part numbering. Part visibility does not affect the visibility of any chapters contained within a part.
- Click Save.

Delete a Part
If you’ve created a part that you no longer wish to include in your book, you can delete it. To do so:
- Click ‘Organize‘ in your book’s left-hand admin menu.
- Hover over the name of the part you’d like to delete and click ‘Trash‘

Edit or Rename a Part
To edit or rename an existing part:
- Click ‘Organize‘ in your book’s left-hand admin menu.
- Click the name of the part you’d like to edit (or hover over the part’s name and click ‘Edit‘
- Make the desired changes
- Click the ‘Save‘ button.
You can check that your change is reflected by returning to the Organize Text screen from the dashboard. For a visual intro to parts and chapters, check out our tutorial video.
Make a Part ‘Invisible’
If you’d like to have more than one Part in your book but want a certain set of chapters to appear as though they sit outside of any Part, you can make the part in which they occur “invisible.” To create an Invisible Part:
- Select a Part from the Organize page and enter its editor interface
- Find the “Part Visibility” panel
- Select the box for the “Invisible” setting
- Save your changes
Afterward, the chapters in that Part should appear in the table of contents as if they do not belong to a Part. Below is an example of what a table of contents may look like with an Invisible Part:
Foreword
1. A First Chapter
2. Another Chapter
PART I: THE FIRST PART
3. A Third Chapter
4. Yet One More Chapter
PART II: THE SECOND PART
5. A Fifth Chapter
Changing the Part Label
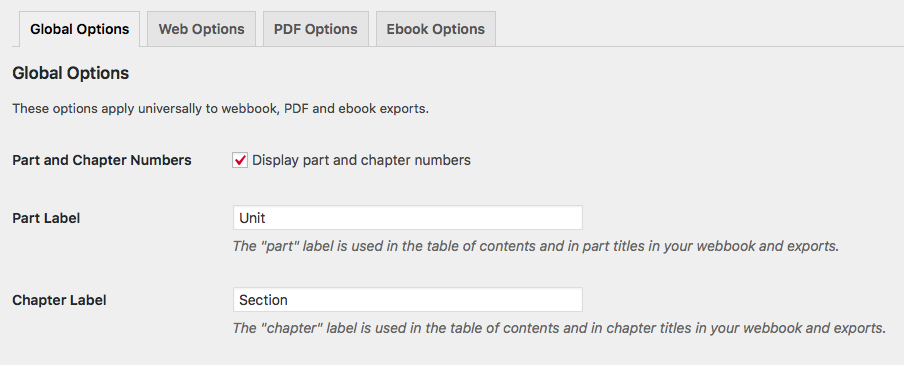
As previously noted, the default label for the organizing unit which contains chapters is ‘part’. If you’ve chosen to display part and chapter numbers in your book, you can replace this default label with the name of your choice. To customize the Part label in your book:
- Click ‘Appearance > Theme Options‘ from the left sidebar menu in Pressbooks
- Enable the ‘Part and Chapter Number‘ setting from the Global Options tab.
- The “Part Label” and “Chapter Label” settings will appear. Enter your preferred Part Label.
- Click Save Changes at the bottom of the page

The labels will change wherever they are used in the given format of your book. This includes the table of contents in some formats and the part and chapter title wraps for all formats.
